
Video Upload Guide: Tips & Tricks
💡 When recording locally you are responsible for HIPAA compliance. HIPAA compliance depends on the full environment and workflow used to handle the recording, including the security of the computer, storage location, access controls, encryption, and your University’s and Supervision Sites own policies. If the device and storage environment where the video is being stored meet those requirements you may safely upload videos and use the guides below.
Tip 1: Turn on “Save After Upload”
When uploading videos, we highly recommend checking Save After Upload. This ensures that once the upload finishes, the video is saved in Supervision Assist automatically—without an additional prompt.

Note: Avoid having other Supervision Assist tabs open during an upload. Multiple open tabs may trigger an automatic lockout (normally disabled while a video is uploading)
Tip 2: Test Your Estimated Upload Time
It helps to understand how long an upload may take depending on your internet speed and video file size. For example, an average 40 minute counseling session may take 1 hour and 25 minutes to upload using your home internet. You can get your own estimate by following the steps below.
- Run a speed test to find your upload speed (Mbps):
- Use an upload-time calculator:
- Enter:
- Your upload speed (example: 5.0 Mbps)
- Your estimated file size
- Rough Guideline: Recording minutes × 80 MB per minute
- Example: 40 minutes × 80 MB/min = 3,200 MB (~3.2 GB) → roughly 1 hour 25 minutes to upload at ~5 Mbps (estimate varies by connection speed).
Tip 3: Reduce Video Size with Slow Internet.
Supervision Assist will automatically convert videos to a standard format whenever possible. However, you may want to convert your video before uploading if
- Slow Uploads: When your internet connection is too slow or unstable and you wish to reduce video file size.
- Video Not Processing: In rare instances when a video can't be converted by Supervision Assist you may wish to convert it to a smaller or more compatible tip.
Please follow this guide below for some tips and trick to convert your video file.
PC/MAC Guide to Converting Video
Recommended Tool: Handbrake
-
Download and install Handbrake.

-
Select the file you wish to upload to Supervision Assist.

- Recommended Settings
- Under Preset, choose Fast 720p30 (helps reduce file size).
- Set Format to MP4 (usually the default).
- Check Web Optimized (under Format).
- Click Start Encode.
- Upload the newly converted MP4 file to Supervision Assist.
- Security reminder: Delete any local, unsecured video files after upload. Supervision Assist is not responsible for recordings stored on a personal computer or phone.


💡 If the device and storage environment where the video is being converted meet your University's HIPAA requirements, then using a local conversion tool such Handbrake may be an appropriate option. Supervision Assist is not responsible for the HIPAA security of a users local device.
iPhone/iPad Guide to Converting Video
- Confirm your device is up to date with the latest iOS.
- Install iMovie from the App Store (if needed).
- Open your video in iMovie.
- Tap Share.
- Tap Options to adjust export settings.
- Confirm the export type is MP4 (or MP4-compatible).
- Log in to Supervision Assist and upload the exported video.
Android Guide to Converting Video
Most android phones will save videos as MP4 by default, so no guide is needed.
Tip 4: Alternative to Upload
When none of the other options work, you may upload the video by recording a screen share in a live session. There will be some degradation of quality using this method, but is an easy and straightforward way to upload a vdieo.
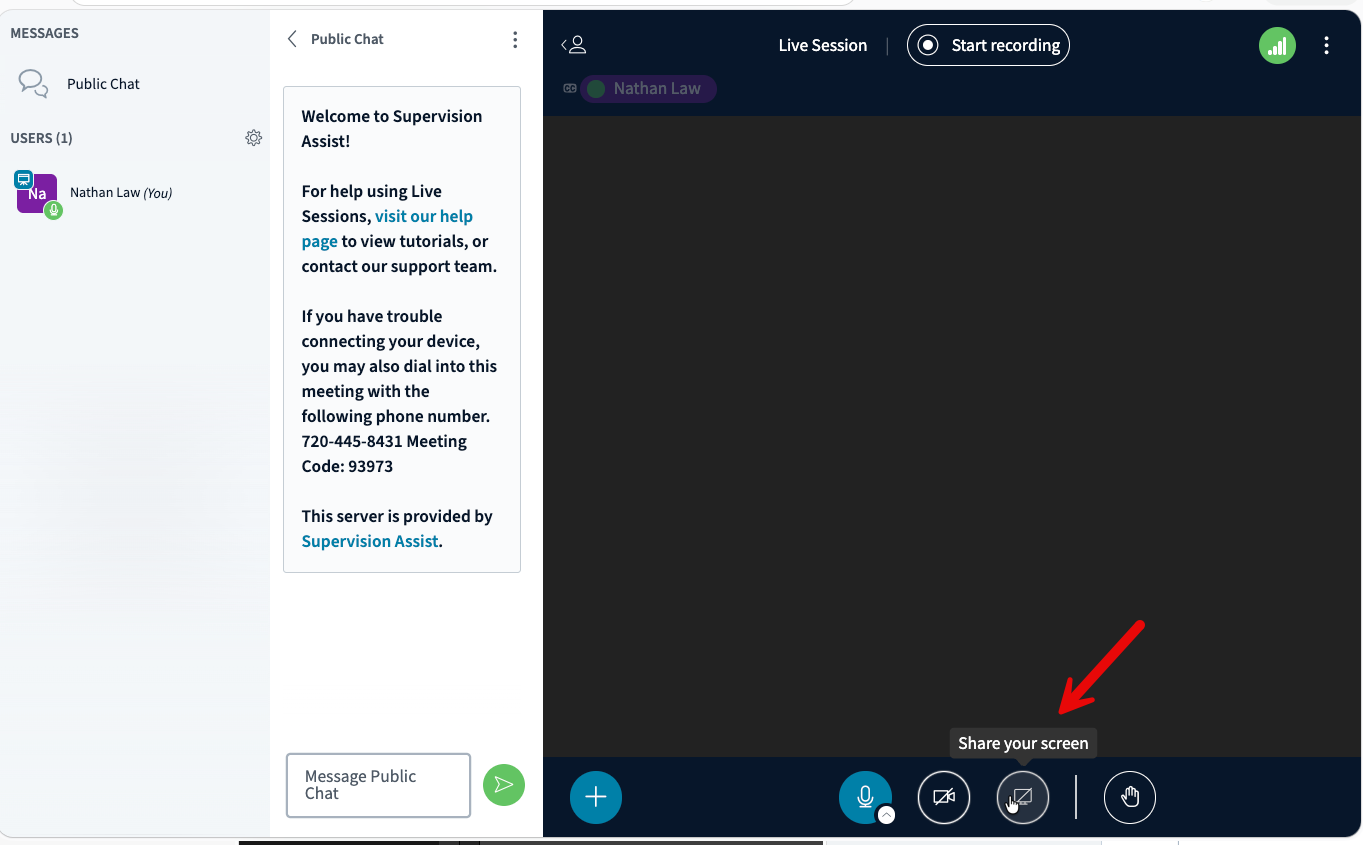
- Login to Supervision Assist and Create a Live Video Session
-
Select Share Screen
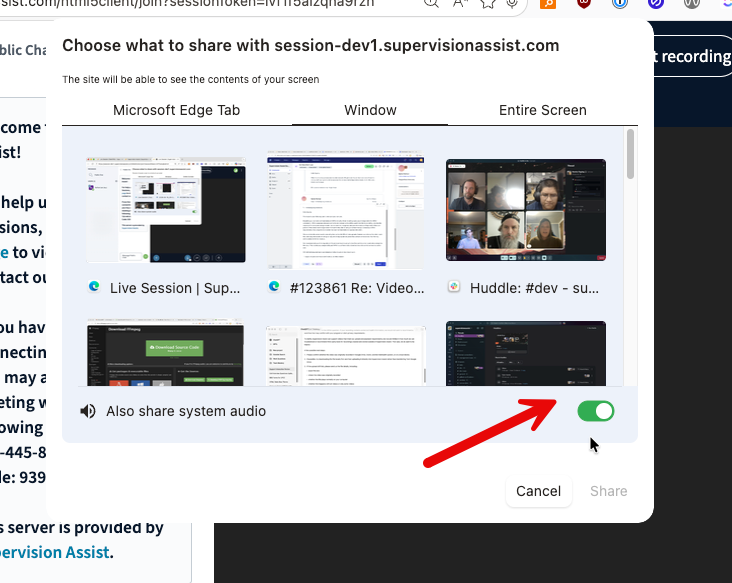
-
Select Share Window and Make sure that Also Share System Audio is selected
- Hit the record button within Supervision Assist
- Play the entire video on your computer until it is complete.
Please let me know if you have any other questions and/or concerns.